Introduction
Getting the right T-shirt Design Size is essential for achieving clean, professional print results in custom t-shirt printing. Whether you’re building a clothing brand or designing for clients, size plays a major role in how your final product looks.
The global T-shirts market was valued at USD 185.2 billion in 2024 and is projected to reach USD 221.5 billion by 2032, showing strong growth in the custom apparel printing industry. This makes understanding T-shirt Design Size even more important for designers and businesses.
However, many people still face issues like blurry prints, poor alignment, or incorrect scaling across shirt sizes. These problems usually happen when the design size for a t- shirt is not planned properly.
In this guide, we’ll break down everything you need to know about T-shirt Design Size so you can achieve perfect print results every time.
Key Takeaways
- The right T-shirt Design Size is essential for clean and professional print results
- Different placements need different t-shirt design dimensions for best output
- Always use high-resolution (300 DPI) files to avoid blurry prints
- A proper t-shirt design size chart helps maintain consistency across all shirts
- Print method (DTF, DTG, embroidery) directly affects the ideal design size for t shirt
What is T-Shirt Design Size?
The T-shirt Design Size refers to the exact dimensions of your artwork that will be printed on a t-shirt. It decides how big or small your design will appear once it is printed on a T-shirt.

It’s important to understand that the design size for a t- shirt is not just about how the artwork looks on your screen. It includes three key parts:
-
Design size – the actual dimensions of your artwork file
-
Print area – the maximum space available for printing on the shirt
-
Placement size – where the design is positioned (chest, back, sleeve, etc.)
When these three elements are balanced properly, your T-shirt Design Size looks clean, aligned, and professional on the final product.
If the sizing is wrong, even a good design can look stretched, too small, or poorly placed. That’s why understanding t-shirt design dimensions is very important before you start printing.
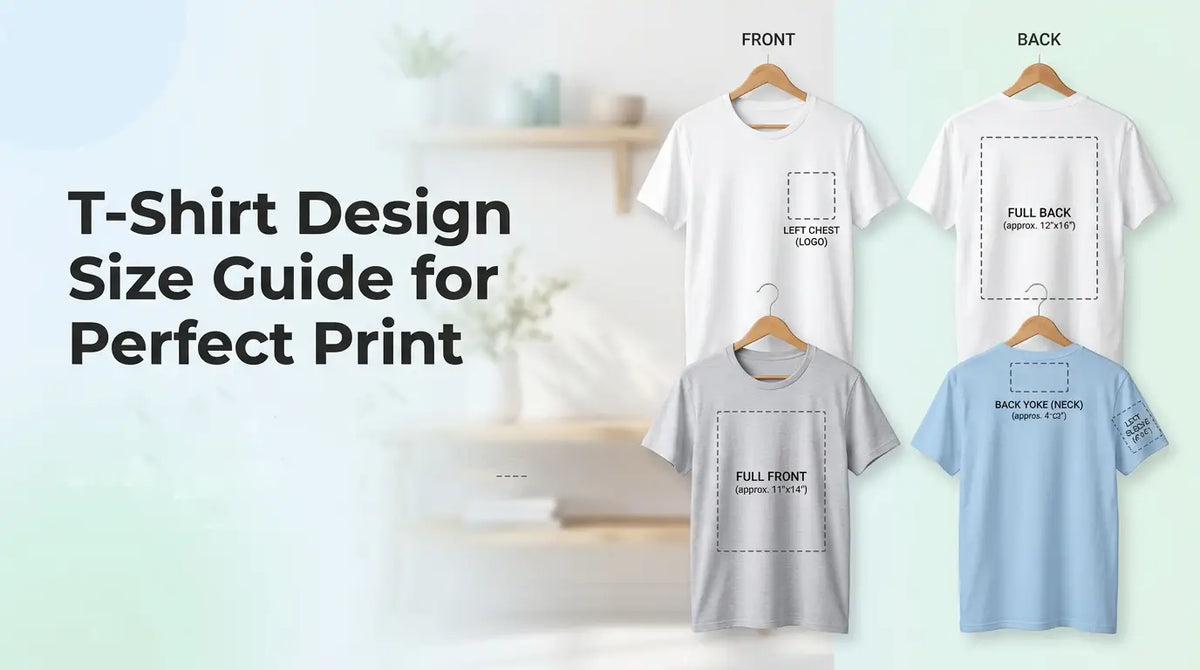
What Are the T-Shirt Design Placement Options and Standard Sizes?
Now that we understand the concept, let’s look at the different placement options and the standard dimensions that work best for each. Placement is just as important as size because it directly affects how your design looks, how it is perceived, and how balanced the final shirt appears.

1. Left Chest Placement
This is one of the most popular and professional spots for logos and branding.
-
Standard size range: 3"–4" wide
-
Best use: Company logos, small icons, or subtle branding elements
It offers a clean and minimal look, making it perfect for uniforms, corporate wear, and promotional apparel.
2. Center Chest Placement
A great option when you want your design to be visible but not overpowering.
-
Standard size range: 6"–8" wide
-
Best use: Minimal graphics, slogans, or simple artwork
This placement creates a balanced look and naturally draws attention to the design.
3. Full Front Design
Ideal for bold and eye-catching artwork.
-
Standard size range: 10"–12" wide
- Best use: Large graphics, branding campaigns, or event merchandise
This is commonly used when maximum visibility is the goal in custom t-shirt printing.
4. Oversized Front Design (Streetwear Trend)
A popular choice in modern streetwear fashion.
-
Standard size range: 12"–14" wide
-
Best use: Bold graphics, artistic prints, or trendy statement designs
It gives a stylish, edgy, and fashion-forward appearance.
5. Full Back Design
Perfect when you need more space for your message or artwork.
-
Standard size range: 10"–12" wide
-
Best use: Names, slogans, team jerseys, or large artwork
Commonly used for sports teams, events, and promotional apparel.
6. Sleeve Placement
A subtle but creative branding option.
-
Standard size range: 2"–3" wide
-
Best use: Small logos, icons, or short text
It adds a unique detail without overpowering the main design.
7. Neck / Inner Label Design
A growing trend in professional apparel branding.
-
Standard size range: 1"–2" wide
-
Best use: Care labels, small logos, or brand identity marks
It’s subtle but helps strengthen brand recognition in a professional way.
What Does a T-Shirt Design Size Chart Look Like?
A t-shirt design size chart helps you quickly choose the right T-shirt Design Size for different placements in custom t-shirt printing. It ensures consistency, balance, and professional-looking results.
T-Shirt Design Size Chart
|
Placement Area |
Standard Size (Inches) |
Best Use Case |
|
Left Chest |
3" – 4" |
Logos, branding, small icons |
|
Center Chest |
6" – 8" |
Slogans, minimal graphics |
|
Full Front |
10" – 12" |
Large artwork, promotional designs |
|
Oversized Front |
12" – 14" |
Streetwear, bold statement designs |
|
Full Back |
10" – 12" |
Names, numbers, large artwork |
|
Sleeve |
2" – 3" |
Small logos, symbols, short text |
|
Neck / Inner Label |
1" – 2" |
Branding, care labels, identity marks |
Using the correct t-shirt design dimensions from this chart helps avoid sizing mistakes and ensures your design looks balanced on every shirt size.
How to Choose the Perfect T-Shirt Design Size
Choosing the right T-Shirt Design Size isn’t just about following a chart—it’s about making sure your design matches the shirt style, audience, and brand identity. Here’s how you can make the best choice:
-
Shirt Type Matters: Oversized tees allow for larger, bolder designs, while slim-fit or regular shirts often look better with more compact artwork.
-
Know Your Audience: A youth-focused streetwear brand may lean toward oversized front designs, while corporate polos benefit from subtle left chest logos.
-
Stay True to Brand Style: Minimalist brands should stick to smaller placements like the chest or sleeve, while bold, creative brands can experiment with full-front or back prints.
-
Scale Across Sizes: A design that looks perfect on a medium shirt may appear too small on an XL. Always adjust the size for t-shirt design to maintain balance across S–XXL.
-
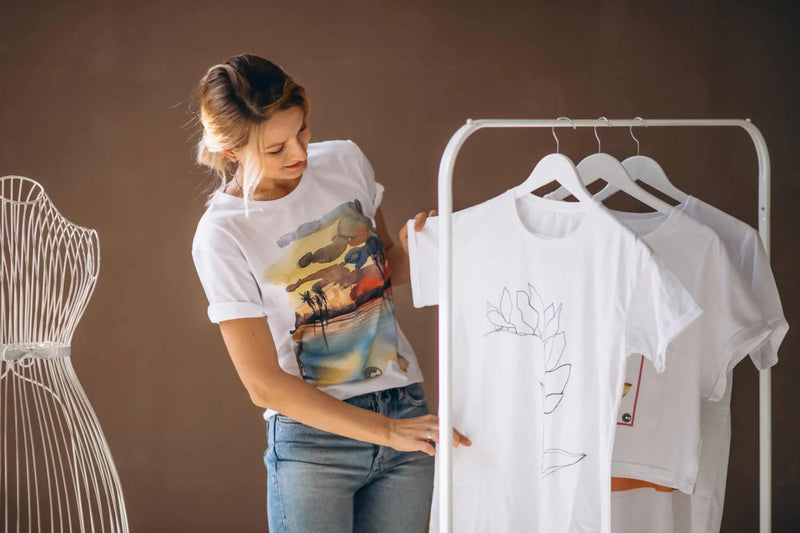
Use Mockups: Before final printing, preview your design on different shirt sizes. Mockups help you catch scaling or alignment issues early.
By considering these factors, you’ll ensure your T-Shirt Design Size looks professional, consistent, and aligned with your brand’s vision.
How Does T-Shirt Design Size Change for Different Printing Methods?
Not all printing techniques handle the same T-Shirt Design Size in the same way. The method you choose—DTF, DTG, or embroidery—directly affects how your design appears on fabric in custom t-shirt printing.

Let’s break it down clearly.
1. DTF Printing Size Guidelines
Direct-to-Film (DTF) printing transfers your design onto a special film before applying it to the shirt.
- Works best with medium-sized T-shirt Design Size layouts
- Maintains good balance between detail and clarity
- Extremely small designs may lose fine details
- Very large designs may feel slightly heavier on fabric
- Ideal for logos, slogans, and vibrant graphics with sharp edges
2. DTG Printing Size Guidelines
Direct-to-Garment (DTG) printing applies ink directly onto the fabric, making it ideal for detailed artwork.
- Suitable for full-front and oversized t-shirt design dimensions
- Best for high-resolution graphics, gradients, and colorful artwork
- Requires proper DPI (300 DPI recommended) for best results
- Fabric absorption may slightly soften fine details
3. Embroidery Size Guidelines
Embroidery printing adds a premium, textured finish but has clear size limitations.
- Works best with small T-shirt Design Size elements
- Ideal for logos, initials, and minimal text
- Complex or oversized designs may lose clarity due to stitching limits
- Recommended size: 2"–4" wide for clean and professional results
Matching the correct T-shirt Design Size with the right printing method is essential for achieving high-quality results. It ensures your final product looks professional, durable, and aligned with your brand identity.
Why Is DPI and Resolution Important for T-Shirt Design Size?
When working with T-shirt Design Size, one of the most important factors that affects print quality is DPI and resolution. Even if your design looks perfect on screen, poor resolution can ruin the final result in custom t-shirt printing.
What is DPI?
- DPI stands for Dots Per Inch. It refers to how much detail your design has when it is printed.
- Standard for printing: 300 DPI
- Lower DPI can cause blurry or pixelated prints
- Higher DPI ensures sharp and clear details
For the best T-shirt Design Size, always design at 300 DPI from the beginning.
How Resolution Affects Print Quality
Resolution determines how clear your design will look when printed on fabric.
- Low resolution = blurry edges and faded details
- High resolution = sharp, clean, and professional prints
- Small designs stretched to large sizes lose quality quickly
Always create your T-shirt Design Size in high resolution and avoid scaling up small files.
What Are the File Requirements for High-Quality T-Shirt Printing?
To achieve the best results in custom t-shirt printing, your file setup is just as important as your T-shirt Design Size. Using the correct formats and settings ensures your design prints clearly and professionally. Here’s what you need to know:
Supported Formats:
-
PNG: Best for logos and designs with transparent backgrounds.
-
JPG: Works well for full-color photos and artwork.
-
SVG: Perfect for vector graphics that need to scale without losing quality.
File Size Limits: Large files can slow down processing, but overly compressed files lose detail. Aim for high-resolution files that balance clarity and manageable size.
Color Mode:
-
RGB: Designed for screens, but not ideal for print.
-
CMYK: The standard for printing, ensuring colors appear accurate on fabric.
-
Example: A neon green in RGB may look dull when printed unless converted properly to CMYK.
Transparency Usage: For designs like logos or text overlays, use PNG with transparent backgrounds to avoid unwanted white boxes around your artwork.
By following these requirements, you’ll ensure your custom t-shirt printing results are sharp, vibrant, and professional—no surprises when your design moves from screen to fabric.
What Are the Common T-Shirt Design Size Mistakes to Avoid?
Even with the right T-Shirt Design Size chart and placement options, many people still make mistakes that affect the final print quality. Avoiding these pitfalls will save you time, money, and frustration:
-
Using Low-Resolution Artwork: Designs pulled from the web at 72 DPI often look pixelated when printed. Always use high-resolution files at 300 DPI.
-
Wrong Scaling Ratio: A design that looks perfect on a medium shirt may appear too small on an XL or overwhelm a small shirt. Always adjust the design size for t-shirts across different sizes.
-
Ignoring Placement Alignment: Misaligned logos or off-center graphics can make even the best artwork look unprofessional. Double-check placement before printing.
-
Not Checking Different Shirt Sizes: Previewing your design only on one size is risky. Use mockups to see how your t-shirt design dimensions scale across S–XXL.
-
Skipping Mockup Testing: Without mockups, you won’t know how your design interacts with shirt seams, collars, or sleeves. Testing avoids costly mistakes.
By steering clear of these common errors, you’ll ensure your custom t-shirt printing results are sharp, balanced, and consistent across every order.
What Are the Pro Tips for Perfect T-Shirt Design Size Results?
Getting the T-Shirt Design Size right is essential, but a few extra tricks can take your custom apparel from good to outstanding. Here are some pro tips to guarantee sharp, professional, and consistent results:
-
Always Design at 300 DPI: This ensures crisp lines and prevents pixelation, no matter the print size.
-
Use Vector Files for Logos: Formats like SVG or AI scale perfectly without losing clarity, making them ideal for branding elements.
-
Keep Designs Within Safe Zones: Avoid placing text or logos too close to edges—this prevents accidental cut-offs during printing.
-
Test Print Before Bulk Orders: A single sample helps you catch scaling, alignment, or color issues before committing to large runs.
- Match Design Size with Shirt Style: Oversized tees can handle bold, large graphics, while slim-fit shirts look better with compact designs.
- Preview Mockups Across Sizes: Check how your t-shirt design dimensions look on small, medium, and XL shirts to maintain consistency.
By following these tips, you’ll not only achieve high quality custom printing but also build trust with your customers through professional, well-executed apparel.
Also Read: How to Start a T-Shirt Business That Actually Makes Money in 2026
Conclusion
Choosing the right T-shirt Design Size is essential for achieving clean, sharp, and professional results in custom t-shirt printing. From placement and resolution to printing methods and file setup, every detail plays an important role in the final output.
By following this complete t-shirt design size guide, you can avoid common mistakes like poor scaling, blurry prints, and incorrect placement. It also helps ensure your design size for t-shirts looks balanced and consistent across all shirt sizes.
If you want high-quality custom printing with accurate sizing and professional results, Aesthetic Bk is here to help you bring your designs to life with precision and style.
Leave a comment
This site is protected by hCaptcha and the hCaptcha Privacy Policy and Terms of Service apply.